Themes
From Ccwiki
Contents |
[edit]
Introduction
- Info:
- A theme is the look of BM and consists of font, background image and color, as well as text color and position and size of the single menu elements.
- Details:
- Each theme contains two images, one for the background (BMMENU.TGA) and one for the font (BMFONT.TGA), and a "THMINFO.PBT" containing all infos about color and menu positioning. Themes are located in the BM/THMS directory, each in an extra subfolder, and are configured and managed with the "ThemeManager" menu. The images are in TGA format and can be created with grafics software, e.g. the freeware software "Gimp 2".
[edit]
THMINFO.PBT
- Info:
- Every theme needs a THMINFO.PBT, containing all necessary Information for BM. It's mostly the same as the APPINFO.PBT for apps, but contains additional infos about position and size of menu elements and the color for font and background, for all video modes.
- Details:
- The following example is the THMINFO.PBT of the BM1 theme, distributed with every BM. The forst parts are the same as in the APPINFO.PBT, the :LOAD section has after # PAL and # VGA the same entries as after # NTSC, it's just been cut a little to save some space and to have a better overlook.
 #
 # Default "theme" for Crystal Chips BootManager
 #

 #
 # Change this information to describe the theme.
 SET "TITLE" "Old BootManager 1.x"
 SET "VERSION" "v1.0"
 SET "AUTHOR" "Crystal Chips: http://www.crystal-chips.com/"
 SET "DESCRIPTION" "This is the old BootManager 1.x theme."
 #

 # Do not change these 2 lines!
 GOTO "$ARG1$"
 RETURN "-1"

 :LABEL_NAME
     ADDWIDGET "LABEL" "$ARG2$$TITLE$ $VERSION$"
     EXIT "0"

 :QUERY
     ADDWIDGET "CALL" "  $TITLE$" "$BM.TXT_VERSION$: $VERSION$   $BM.TXT_AUTHOR$: $AUTHOR$
     $BM.TXT_DESCRIPTION$: $DESCRIPTION$" $ARG2$ "$ARG0$" "$ARG3$" "$ARG4$" "$ARG5$"
     EXIT "0"

 :INSTALL
     IF FAIL COPY "$PWD$" "$ARG2$/BM1"
         MESSAGE "Failed installing $TITLE$!"
         RRM "$ARG2$/BM1"
         RETURN -1
     ENDIF

     EXIT "0"

 :REMOVE
     IF FAIL RRM "$PWD$"
         MESSAGE "Failed removing $TITLE$!"
         RETURN -1
     ENDIF
     EXIT "0"
- This first part has the same funktion as the corresponding sections inside the APPINFO.PBT. A detailed explanation can be read above under the APPINFO.PBT headline.
 :LOAD
     IF NOT EQU "$BM.LOADED_THEME_SCRIPT$" ""
         LOADEXEC "PBAT" "$BM.LOADED_THEME_SCRIPT$" "UNLOAD"
     ENDIF

     IF FAIL LOADIMG "$PWD$/BMMENU.TGA" "BM1_MENU"
         ECHO "Failed loading menu image!"
         RETURN -1
     ENDIF

     IF FAIL LOADIMG "$PWD$/BMFONT.TGA" "BM1_FONT"
         ECHO "Failed loading font image!"
         UNLOADIMG "BM1_MENU"
         RETURN -1
     ENDIF

     SET "BM.MENU_IMG_NAME" "BM1_MENU"
     SET "BM.FONT_IMG_NAME" "BM1_FONT"
     SET "BM.THM_CNF_BG_COLOR" "0x00332111"
     SET "BM.THM_CNF_FONT_COLOR_SELECTION" "0x00C0C0C0"
     SET "BM.THM_CNF_FONT_COLOR_LABEL" "0x00C0C0C0"
     SET "BM.THM_CNF_FONT_COLOR_SCROLLER" "0x00C0C0C0"

     IF EQU "$BM.CNF_VMODE$" "0"
         # NTSC
         SET "BM.THM_CNF_MENU_IMG_X" "0"
         SET "BM.THM_CNF_MENU_IMG_Y" "0"
         SET "BM.THM_CNF_MENU_IMG_WIDTH" "0"
         SET "BM.THM_CNF_MENU_IMG_HEIGHT" "0"
         SET "BM.THM_CNF_MENU_X" "100"
         SET "BM.THM_CNF_MENU_Y" "120"
         SET "BM.THM_CNF_MENU_WIDTH" "500"
         SET "BM.THM_CNF_MENU_HEIGHT" "300"
         SET "BM.THM_CNF_MENU_TITLE_X" "142"
         SET "BM.THM_CNF_MENU_TITLE_Y" "84"
         SET "BM.THM_CNF_MENU_TITLE_WIDTH" "386"
         SET "BM.THM_CNF_MENU_TITLE_HEIGHT" "32"
         SET "BM.THM_CNF_SCROLLER_X" "132"
         SET "BM.THM_CNF_SCROLLER_Y" "395"
         SET "BM.THM_CNF_SCROLLER_WIDTH" "423"
         SET "BM.THM_CNF_SCROLLER_HEIGHT" "32"
     ELSEIF EQU "$BM.CNF_VMODE$" "1"
         # PAL
         .
         .
         .
     ELSE
         # VGA
         .
         .
         .
     ENDIF

     SET "BM.LOADED_THEME_SCRIPT" "$ARG0$"
     KEEP
     RETURN 0
- This section contains all needed infos about loading the theme. At first the old theme is unloaded, then BM loads the new background image and the new font.
- In the next step all theme settings are loaded. first those that are the same for all video modes, e.g. colors, then those that are different for the various video modes, e.g. position and size of the background image. Under # PAL and # VGA you can normally find the same entries as under # NTSC, but with adjusted values.
- Last but not least, the loaded THMINFO.PBT is set in the config.
 :UNLOAD
     SET "BM.MENU_IMG" ""
     SET "BM.FONT_IMG" ""
     UNLOADIMG "BM1_MENU"
     UNLOADIMG "BM1_FONT"
     EXIT 0
- This section is used to unload the theme, in case something went wrong during loading, or when an other theme should be loaded.
[edit]
BMMENU.TGA
- Info:
- BMMENU.TGA is a TARGA image with alpha channel to manage transparency. The resolution is limited to 400x240 because of the small VRAM of the PS 2 (only 4 MB). At least, you need to flip the image vertically because BM only support top left TGA files. Themes are under development, so all those restrictions will probably change in the future.
- Details:
- To create a TGA file, you need a picture editing software like Photoshop, The Gimp or Paint Shop Pro.
- Here is how to create an Alpha Channel with those three applications. (thanks to this unreal wiki for the tutorials).
- Photoshop
- Make the selection of the part of the image you want to be visible. Use the useful selection tools of Photoshop to do this.
- Go to the channels tab, and press the button "Save selection as channel". A channel named Alpha1 should appear.
- Now save your image as a TGA file, 32 bits, with RLE compression on.
- Paint Shop Pro
- Do Main menu→Selections→Select All, and press CTRL-C to copy the image to the clipboard.
- Press CTRL-V to paste it as a new image (you will be working on the cloned image first).
- Select the parts of the image you want to make transparent. The Wand selection tool is useful for this. Hold down the shift key to select multiple parts of the image.
- Take your floodfill tool and select a dark colour (the darker the colour, the more transparent the pixel will be). Floodfill within the selected areas.
- In the menu, do Selections→Invert. This will invert your selection.
- Whatever you do not want transparent is now selected. Take your floodfill tool and select a light colour (the lighter the colour, the less transparent the pixel will be). Floodfill within the selected areas.
- In the menu, do 'Layers→Load/Save Mask→Save Mask to Disk'. Type in a filename and hit Save.
- In the menu, click on 'Selections→Select None' to deselect everything.
- Reopen your original image.
- In the menu, click on 'Selections→Select All'.
- In the menu, click on 'Layers→Load/Save Mask→Load Mask from Disk'and look in the menu bar at the top of screen for Mask. Select Mask→New→From Image. In this dialogue box, # for the source window, the pulldown box, 'blank' and select your masked texture's filename, and press ok.
- Select Masks→Save to Alpha channel from the menu. Just agree with the next two windows (hit 'OK'), and save your new masked image. Make sure you choose .TGA file format (it will be listed as Truevision TARGA (.TGA)).
- The Gimp
- Select the parts of the image you want to be visible. (Or select what you want to be transparent, and do Select→Invert.)
- Do Layer→Mask→Add Layer Mask
- In the dialog, set Initialize Layer Mark to 'Selection'
- You can make further changes by painting directly on the layer mask. The layermask is just a grayscale image; black means fully transparent and white fully opaque.
- The new mask is selected in the layer list. Before you save, click on the original layer to select it. (Otherwise, saving will only export the grayscale mask.)
- When saving as TGA, the export procedure will tell you it needs to "Apply layer mask". Click 'Export'.
- Another way to do is it right click on the layer and select "Add alpha channel" and use the Erase tool or Edit→Clear to erase the parts you want transparent.
[edit]
How to make a great theme
- To make a nice theme, make a copy of the provided theme BM1, keep the BMFONT.TGA or create your own (if you don't, edit the THMINFO.PBT accordingly to put away the BMFONT related lines) and rename the folder and the THEME name in the THMINFO.PBT file.
- Now prepare your image. You need 5 parts in it : one for the menu title, one for the version number, one for the scroll hint, one for the CD/DVD icon, and one for the main text. Here is an example :
-
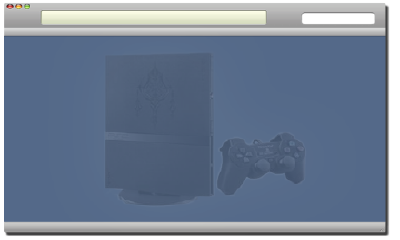
- Once you've prepared your image, try it with the THMINFO.PBT default value on the theme BM1. Now, for each video mode, try to adjust the position of each part of the text and report the good values in the THMINFO.PBT.
- Install again the whole thing, and if everything fit, you're done.

