|
|

Instructions

Instructions
Good installation practises for DMS3:
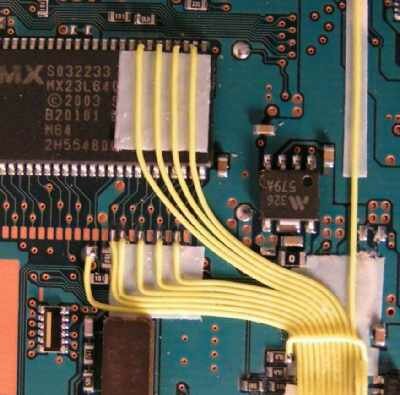
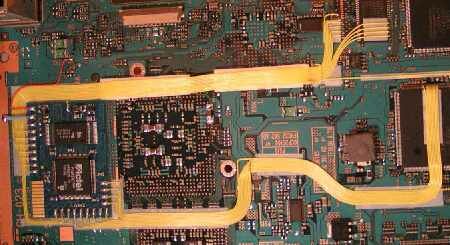
Wires D and E should be routed flat along the motherboard and should not cross twice any other wires.
Avoid passing the wires accross large BGA chips and over the microchip eeprom near BIOS, since this will create interference The same principal goes for O and X. Failure to follow this rule can result in crosstalk between the wires and cause a black screen on boot.
***This is particularly important on V3/4 gap bios'.***
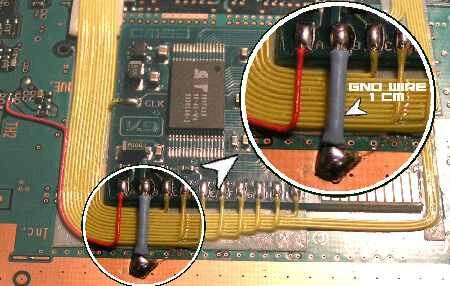
We cannot stress enough how important it is to pay attention to the length and thickness of the ground wire! This is a common error and is the cause of the majority of non functioning installations. Often resulting in a black screen on boot. Long, thin wires will cause "ground-bounce" between the chip and the PS2 motherboard resulting in failure.
If your chip fails with a black screen on boot, check the aforementioned points. It is likely that the install is at fault and not the chip. A replacement chip will not remedy a flawed install. Unless you fix of the cause of the problem, i.e. the wire length, type, positioning the DMS3 will not function correctly.
The DMS3 patches approximately 100 times more data than other chips such as magic3 and messiah2. It also draws more current due to the extra components on-board, such as the flash. It is therefore more sensitive to dubious installations.
Chips with a lesser feature set do not have the same current requirements and therefore are less sensitive incorrect usage of wire type for +ve and -ve.
Just because your wiring works with a magic3 or messiah2 does not mean that it follows basic electronic "good practices", nor is it an indication that the DMS3 chip is at fault.
If the above procedures are followed, your DMS3 will function correctly without a glitch!
Placement/Install
The Ground (Point B) wire should be multicore 20 awg or larger. A similar thickness to the power supply wires in a PC is good. The chip should be placed flat against the PS2 motherboard with as short a wire as possible to a ground pad (recommend same placement as Messiah2). 2cm or less for the ground wire is good. 3.3V(A) should use similar thickness, but can be longer.
30 awg kynar is good for the other wires. They should be routed from point to chip flat along the motherboard, and taped/glued down to minimise the loop area. Avoid crossing sources of high-frequency noise such as the bottom of BGAs.
Troubleshooting
PS2 fails to boot (solid black screen):
Check points D-N. Fix your power and ground wires. Ensure that D and E are laid flat against the motherboard. Make sure you haven't bridged any pins on the BIOS chip of the PS2, the Actel on the DMS3 or the flash chip on the DMS3 ( if the ps2 boot with chip desactivated then you can avoid bridge problem ).
PS2 games fail to authenticate (black screen then browser):
Check points O-W. Fix your power and ground wires. Ensure that O is laid flat against the motherboard.
PS2 games fail to authenticate (browser without black screen):
Check points F-M. Fix your power and ground wires. Ensure that D & E are laid flat against the motherboard.
PS1 games fail to authenticate:
Check point X. Fix your power and ground wires.
PS2 acts as though no chip were installed:
Check point C (Eject). If this wire is not connected, the chip may think you are holding down Eject and go in to Sleep Mode. The same will happen if C is bridged with ground, but in that case you will not be able to turn the PS2 on from stand-by using the Eject button. Fix your power and grounds.
DVD games/movies fail to boot with strange noise but CD ok:
Check point O-W ( lose wire or swapped wire ).If no result suspect your optical system, try to clean it or swap it for a brand new model.
Strange noise when playing audio cd but the remainder is ok:
play your audio cd with chip desactivated
© dms-chip.com 2003. All rights reserved.
|
|